

How to Create a Website – Your own website or blog can be used as a store online, or place content to generate side income with ads or affiliate marketing. The process of creating a website can be a bit tedious and technical for some people. Don’t worry, in this article, we will explain how to make a website so that it is easy for you to follow.
The Basics of How to Creating a Website
To create a website, there are a few basic things you need to understand:
- Domain (your website name, www.yourwebsite.com)
- Hosting (host to the website)
- Platform Website (example: WordPress)
- Content or content website
Domain and hosting are required as prerequisites for creating a website. While website platforms such as WordPress are used to manage the content of the website including the display and functions in it. Further details on each of these components will be described below.
Domain
A domain name is the name and address of your website.
Example: createwebsite.com,yourname.org
You can put whatever name you like. There are some tips you need to know when choosing a name so that your website is easily searchable and found by internet users.
selection tips Domain name :
- Relevant and describe the topic of your website later.
- Nice to remember.
- Easy to spell.
- Avoid using numbers as it will look less professional.
- Unique.
If you have difficulty choosing a name domain, you can use a domain name generator service such as Wordroid or Lean Domain Search.
In addition to the name domain, you also need to choose a TLD. The TLD is the end of a website address such as .com, .my, .net, and so on. Each TLD has a different price tag.
Once you have selected the name domain the appropriate, you must purchase the name domain from the registrar domain. Purchasing a name domain is necessary so that you have the rights to the name domain.
Among the registrar’s domains, the reputable include Namecheap, Godaddy, and Domain .com. But in Wealthy Affiliate, you can get it all in one platform with a keyword research tool.
Hosting
Every website needs web hosting. Web hosting will store information about your website. When a netizen searches for your website or blog on Google, for example, this web hosting will serve or serve the information sought to the netizen.
If your website is likened to a house that contains content, web hosting is likened to a site for the house to be built.
Without web hosting, a website cannot be developed. Web hosting servers provide space for your website to exist in the internet world. It allows your website to be accessed by internet browsers.
The features that you need to consider when choosing a web hosting are:
- has a high level of security.
- Easy to use.
- Able to control high traffic well.
- Good and responsive customer service.
- Offers a reasonable price.
Website development platform
Once you have a name domain and hosting, you need a website platform. This platform is used to post content, add functions, design websites, set up payment gateways, and so on.
There are two simple and popular approaches that can be used to develop a website, website builder and Content Management System (CMS).
Website builder – Wix, Squarespace dan Weebly
CMS – WordPress, Joomla dan Drupal
The WordPress referred to in this article is WordPress.org and not WordPress.com. WordPress.com is more of a website builder than a simple one.
Website builders and CMS are both tools for producing websites. However, the approach used is different. Both have their respective advantages and disadvantages.
In general, website builders like Wix are easier to use but lack options for customization. With a website builder, all processes can be done in one place. Domain and hosting are provided by the website builder. Laying out a website is as easy as creating slides in Powerpoint. The downside is you don’t have the freedom to move your website to another web hosting in the future.
In terms of cost, each website builder has a different payment plan from the basic free plan to the most premium plan.
Comparison of estimated subscription costs for a month:
In contrast to WordPress, WordPress is more technical but has a lot of options for customization. That means you have a variety of options to add functionality and change the look of your website.
Furthermore, the WordPress community is very large with thousands of theme contributors and plugins of all kinds.
But don’t get me wrong, only WordPress is free. You still need to buy a domain and hosting because WordPress is just a platform to manage a website. The cost of creating your own website with WordPress comes from hosting, domains, plugins paid, and even premium themes.
The cost of creating a website with WordPress varies depending on what services we use:
Can I create a free website On WordPress?
The answer can be, by using WordPress.com basic. No need to buy a domain and hosting by WordPress itself. But your website name is not personal and lacks customization. Example of your website.wordpress.com
How to Create a Website with a Website builder
1. Choose the right website builder for you.
The popularity of website builders has been growing since this stalemate. Wix alone has been used by more than 100 million customers while Shopify has 1.2 million users.
The popularity of website builders is increasing because it is more beginner-friendly. With a website builder, anyone can create a website without the need for technical skills. Users can focus on content and design only. The technical aspects are controlled by the website builder.
The website builder famous is Vert, Wix, Weebly, Squarespace, Shopify, and Site123. Most website builders offer a trial free. Use this advantage to try out the website builder you like.
2. Choose a plan that fits your needs and budget.
Most website builders offer several types of plans from the basic to the more premium. Choose a plan that fits your needs so you don’t pay more than you need.
If you just want a simple site like a small business, a cheap plan is enough. But if you want more functionality, consider a more premium plan. If you are not sure, you can just use the basic plan and upgrade later.
3. Choose a name domain a unique and relevant.
As explained above, a name domain is important for every website. Unlike WordPress, domains are purchased directly through the website builder when you sign up. So there is no need to worry about buying a domain from another company. But if you already have the domain owner that you buy, it can only be used in the website builder.
4. Choose the design you like.
Website design for the website builders is easy with the template. The more expensive your plan, the more options template available. But don’t worry, cheap plans also have many elegant designs. The template existing is also suitable for many website categories including blogs, photography, online business, online magazines, and so on.
5. Web design according to creativity.
After selecting the template, you can customize the design according to your creativity. Some of the things you can do are:
- Change fonts and colors
- Add elements such as contacts and menus
- Edit photos and displays
- Choose a color palette
- Link to social media
6. Use the application
Applications are like plugins that are used to add functionality to a website. Some are free and some are paid. Select an application for the website as well as select an application for a smartphone, there are ratings and reviews. Wix has over 300 types of applications. Just find the app you like and add it to the website.
7. Add content, preview and publish.
Lastly is to add content. Content is the main content of your website. Content can be writing, pictures, videos, and so on. After that, make sure you preview the first content. Make sure you preview on mobile as well as on desktop. Once everything looks appropriate and complete, just continue to publish.
How to Create a Website with WordPress
This tutorial will explain how to make a website step by step to buy a domain, web hosting, and install WordPress. WordPress is the most used website developer, accounting for 39% of all websites.
This tutorial uses:
Beli Domain – NameCheap
Buy hosting – Bluehost
One of web hosting the popular is Bluehost. We will use Bluehost as an example in this tutorial. Bluehost is user-friendly and provides good customer service.
Additionally, Bluehost is a WordPress -recommended company. Bluehost also has a 30-day guarantee. If you are not happy with Bluehost, you can refund the money within 30 days.
To register a domain, you can try NameCheap. In fact, you can only buy a domain directly once while subscribing to hosting. But buying a name with NameCheap is more profitable. With NameCheap, you can get privacy protection as a package, but with Bluehost the price of privacy protection is separate.
Register a name domain with NameCheap
NameCheap is one of the registrar’s domains popular and offers affordable prices. To get a domain name using NameCheap:

- Pergi ke NameCheap domain name search (NameCheap.com > domain name search)
- Type the domain name you want and click add to cart .
- Go to your Cart. Make sure Domain Privacy is enabled for privacy protection.
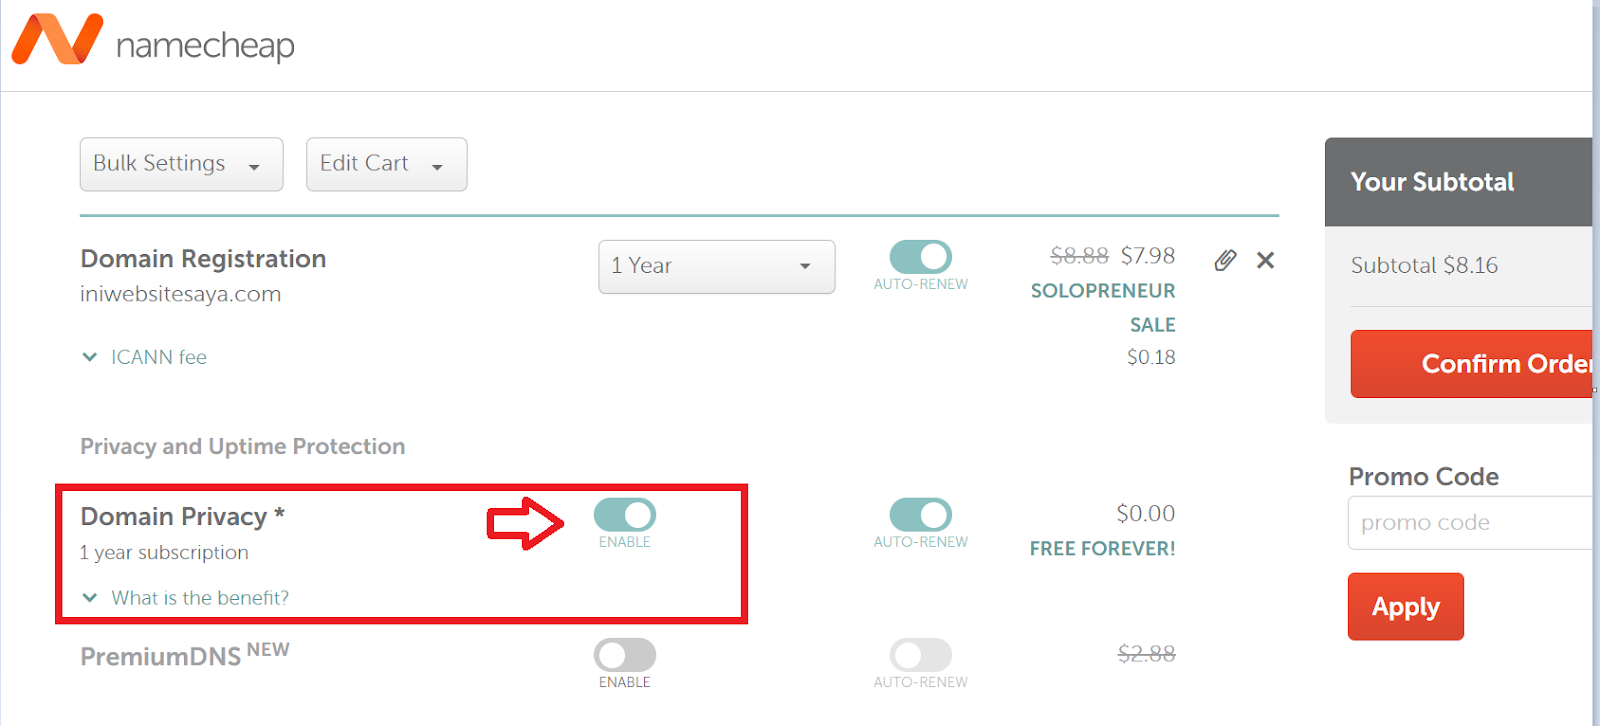
- Then confirm the order and proceed with the payment.
Congratulations !!! Now you have your name domain own
Setting-up Bluehost
- Go to Bluehost.
- Click on get started.

- Choose the plan that you feel is appropriate. If you want to create a website for a blog, a basic plan is sufficient.
- Enter a name domain you have previously purchased from namecheap. If you still haven’t bought a domain, you can press “I’ll create my domain later”.
- Enter the requested account information.
- Make payment.
- Create a password for your account.
Congratulations you now have a Bluehost account!
Setting-up WordPress
- Log into your Bluehost account with the name domain and password you created previously
- Enter a name website and tagline . The tagline can be changed later. Choose for a blog or online store.
- Answer the question.
- Choose the theme you like.
Connect NameCheap dengan Bluehost
Since you have purchased a domain and hosting from two different companies, you need to link the two. If you have purchased a domain from Bluehost, there is no need to follow the steps. Can skip to the next section.
- Log in to your namecheap account.
- Select the domain list (left sidebar).
- Press the domain list and select the manage button next to the domain list .
- Find the nameserver and select custom DNS from the menu options.

- Enter Bluehost nameservers:
- Ns1.bluehost.com
- Ns2.bluehost.com
- Click the sign right green .
- Now go to the website link you www.your-website-name.com/wp-admin
- Login to WordPress using the username and password you have set up in Bluehost. If you have not yet successfully logged in, that means your domain name has not yet connected with Bluehost. This process may take 24-48 hours to complete.
Topic
A good theme design can attract the view of your website visitors. Here are some tips for choosing the right theme:
1. Choose a responsive theme.
Nowadays, people access the internet from various types of devices. There are laptops, desktops, smartphones, and even tablets. Browsing from smart TV is also available. Responsive themes ensure your website is accessible and always looks appealing to readers no matter the device they use.
2. Neat and easy to read.
Not only beautiful and neat, but the website should also be easy to read and able to emphasize the content of your website. No need for excessive graphics on your website. For example, for a blog, you want neat and clear writing while for a business website you need to highlight the products being sold.
3. Paid themes.
Premium or paid themes are important because:
- Allows you to change all aspects of your website
- SEO friendly, responsive when opened with a phone or tablet, and fast. Paid themes are usually paid once in a lifetime.
- You will save time to build your website or blog. The faster you build a website, the faster the money comes in.
- If you have a problem, the support team that released this theme will help you.
Paid themes
Paid themes with design clean and good customer service are available at 17th Avenue Designs. The design theme in this store is more feminine but the colors can be changed to your liking.

Another theme store that has a lot of interesting designs is pipdig. The theme here is also simple and interesting.

To purchase these themes, you need to go to the 17th Avenue Designs website or piping. Don’t search in your WordPress account, until next year you won’t find it.
The price of these themes is usually in the $ 50- $ 70 range. If you purchased the theme at 17th Avenue Designs or piping, just follow the instructions provided. If there is a problem with your blog, just contact customer service.
WordPress Plug-in
Plugins in WordPress are like applications on smartphones. Plugins add functionality to a website. There are many plugins that you can explore and try. Among them:
1. RankMath SEO
Search engine optimization or SEO is a mandatory thing to know when creating a website. SEO is an algorithm that manages and helps your website be found by internet users when they search in a browser. This Yoast SEO plugin is like a beginner’s guide to SEO.
2. GDPR Cookie Consent
Because your website uses cookies to store information from visitors to your website, (eg: IP address), we recommend that you inform your blog users of this. You can perform this step by using the GDPR Cookie Consent plugin.
3. Remove noreferrer
This is a useful plugin if you use affiliate marketing on your website. By default, WordPress adds norereffrer code to every link on the website. With this noreferrer code, the linked website cannot know when their visitors are coming from your website. This plugin removes this noreferrer code.
4. Titan Anti-Spam & security
Sometimes there are malicious hackers who want to try to hack a website. Can install this plugin to provide protection website from malware and viruses.
5. Short Pixel Image Optimizer
This plugin is great for websites that have a lot of images. Images will usually slow down your website due to their large size. If the website loads slowly, readers will lose interest in our website. This plugin provides a solution to this problem.
Tips: plug-ins that burden your website a lot, and make loading time for older users. They will only close your website if you have to wait a long time. So choose only the plug-ins that are important for your website. Proper loading time is also good for SEO.
Cara Install Plugins WordPress
There are some plugins that you need to install on WordPress through certain steps recommended by the plugins provider itself. But typically, plugins can be installed through WordPress itself.
Here’s how to install WordPress plugins in general:
- Log in to your WordPress admin. ( www.your-website-name.com/wp-admin )
- Look for plugins in the black sidebar on the left.
- Click ‘ add new ‘
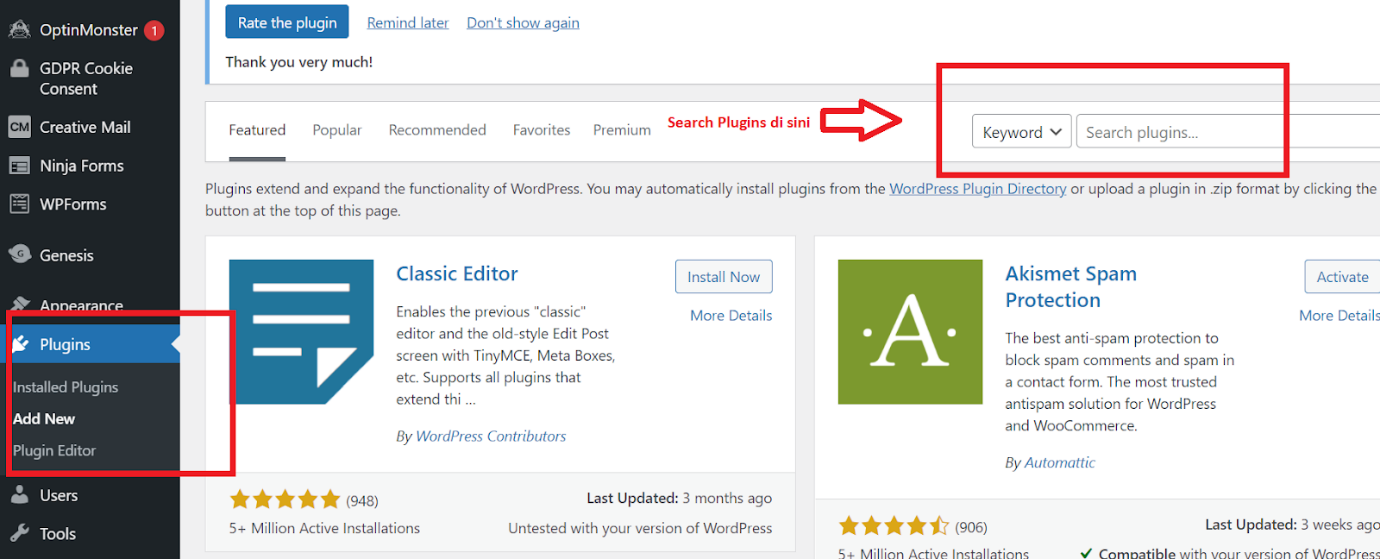
- Search for plugins you want to install.
- Activate the plugins.
How to Set WordPress Menu
The menu is a shortcut to your website. There are two types of Main Menu, Primary and Secondary Navigation Menu. Primary Navigation is usually located at the top of your website. The secondary is on the edge or middle, depending on the theme you choose.

To set the menu:
- Go to Appearance > Menu

- Click primary (Primary Navigation Menu) and click select
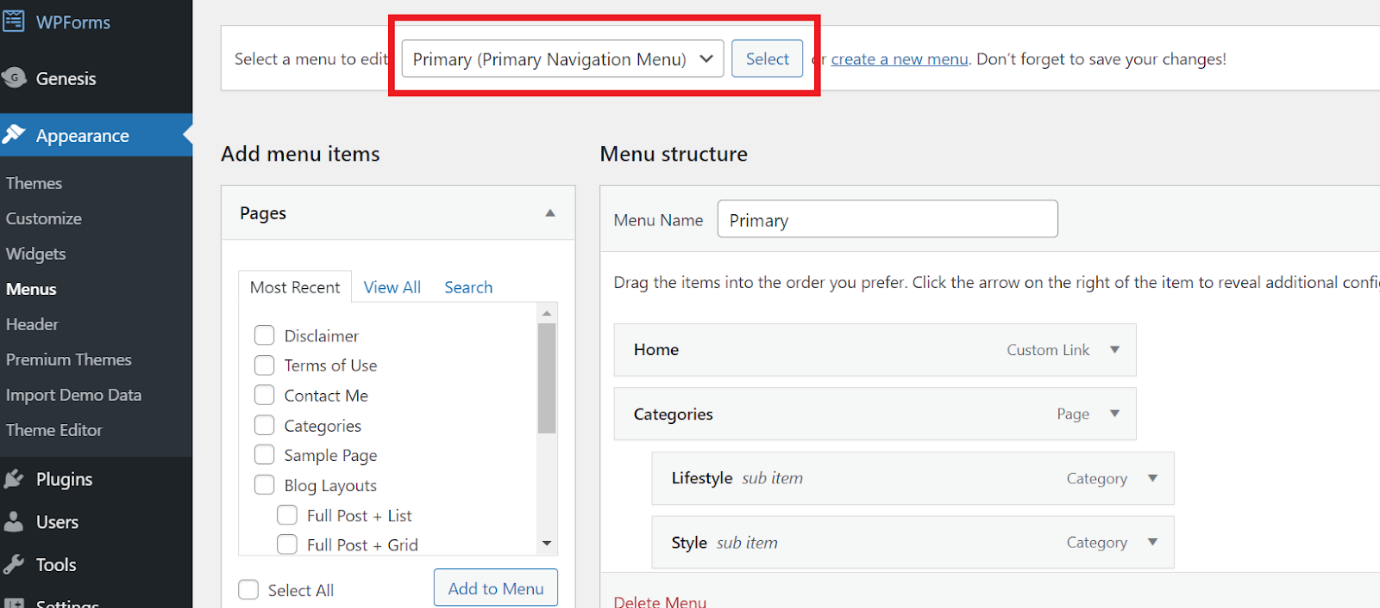
- Select from the Add menu items section. You can arrange in the order you like.
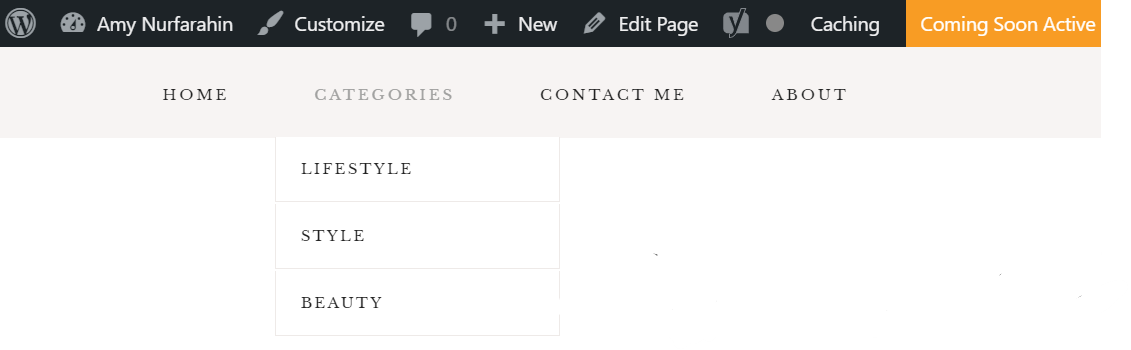
If you want a drop-down menu like the one below, pay attention to the picture above. Drag the ‘Lifestyle’ item and place it under ‘Categories’.
- If you want to add a Home menu, click on Add Menu Items > Custom Links . Then add the URL of your website. Finally enter ‘ Home ‘ in the Link Text and click Add to Menu .
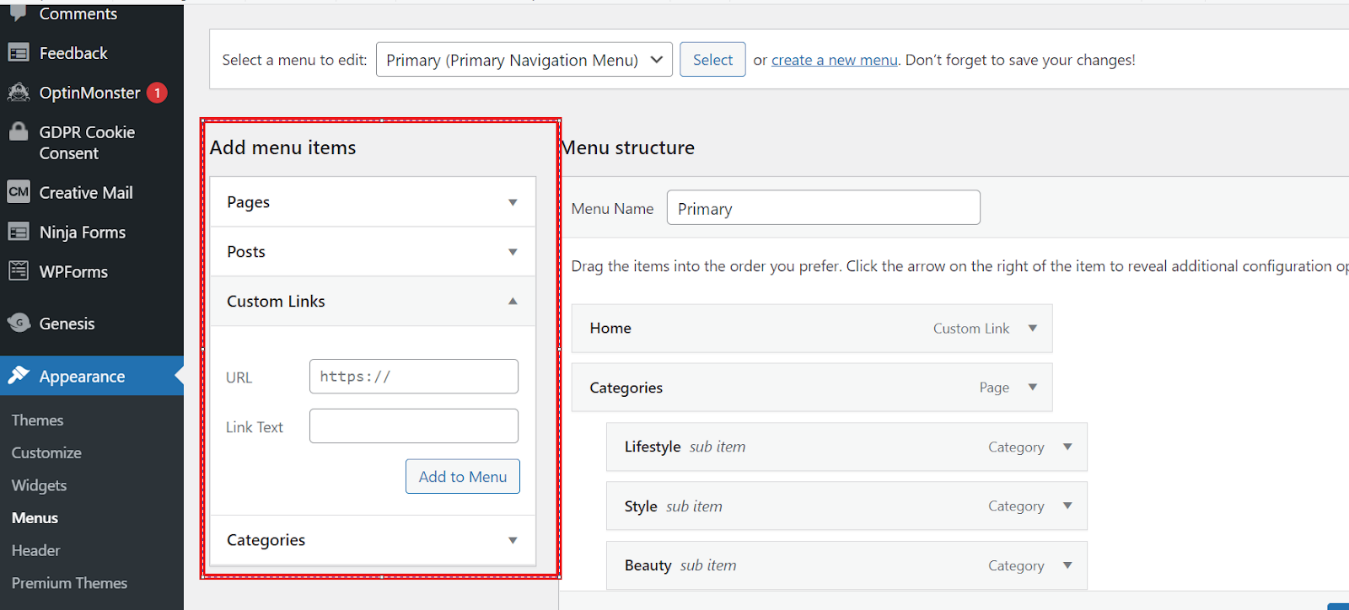
- DON’T FORGET TO SAVE ALL CHANGES. It’s useless to lose.
How to Create Posts and Pages
Pages are the content of your website that does not have a timestamp, meaning there is no date and time you uploaded these pages. Usually, the content of the pages is About Me and Terms of Use.
Post is used to upload content. There is a time and date tied to the post.
To upload a Post :
- Go to Post and click Add New .
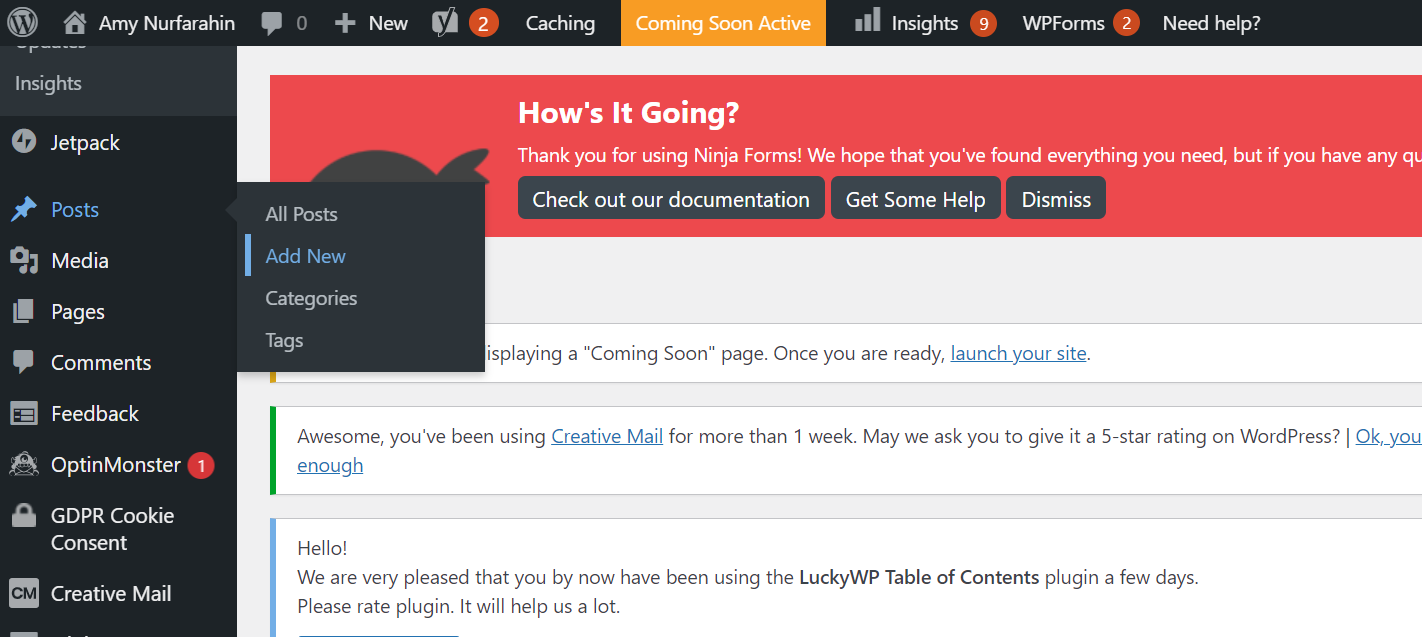
- You will get here:
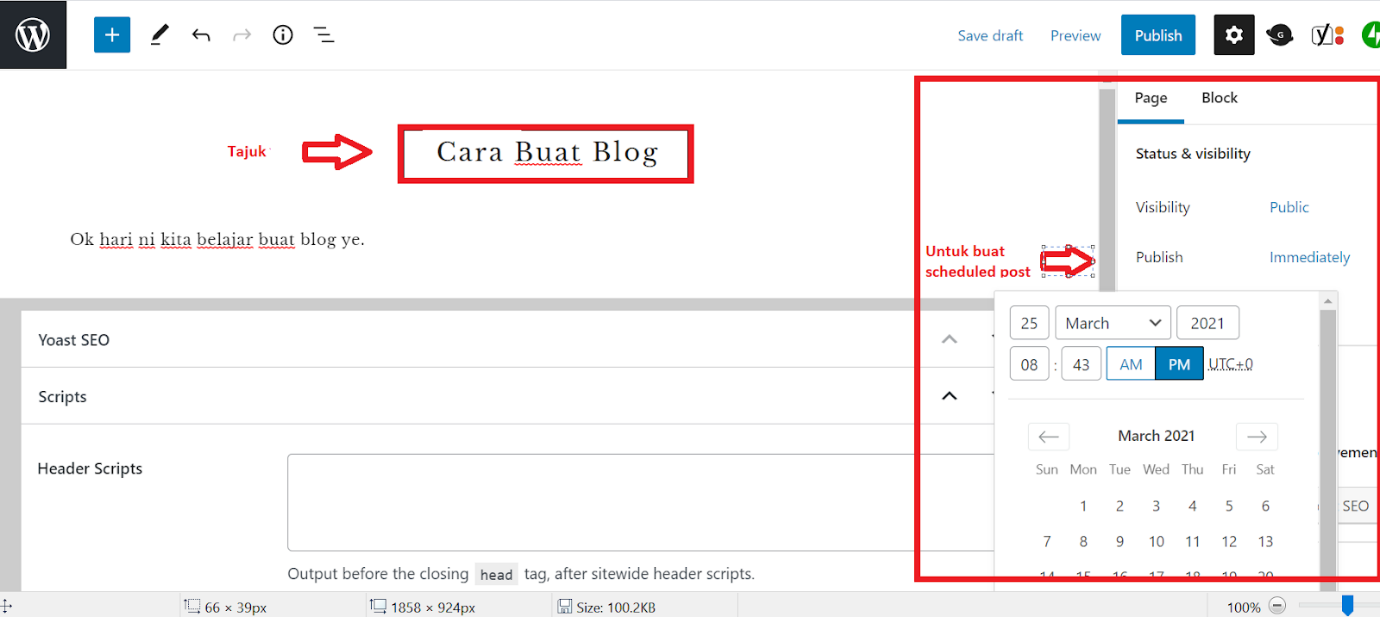
Make sure ‘Visibility’ is set to ‘public’ so that it can be accessed by internet users.
- For a scheduled post , set the date and time as pictured above.
- Finally, click the ‘ ‘ button Publish .
- The way to upload a new page is the same, just go to the left panel and click Pages > Add new .
What Is Google Analytic And How To Setup
Google Analytics is not a priority for website creation. But every website operator must use Google Analytics.
Google Analytics is a tool standard for tracking data from or to a website. With Google analytics you can find out:
- Who are the readers of your website (ie: age group, country of origin of visitors, they access your website from mobile or computer).
- From where your readers know about website your (ie: Pinterest, Instagram, Facebook, Google search or other sources).
- If your website is frequently visited.
- Statistics that can help your website be visited.
Yes, you need Google Analytics to read data about your website so you know how, when and to whom you should promote your website. This information is especially important if the amount of inbound and outbound traffic to your website affects your website’s business or revenue.
So make sure you are proficient in Google Analytics if you are serious about growing the potential of your website.
How much does it cost? Usually powerful tools like this come at a price that tears the pocket. But many don’t know that Google Analytics is free. You do not need a paid plugin like Monster Insight to gain access to website data.
Setup Google analytics
Create an account with Google analytics.
- To make things easier, use Google Chrome as your web browser and sign in to your Google account OR create a Google account if you don’t already have one.
- Go to Google.com/analytics and hit start for free.
- Press start measuring. Enter an account name. Can use anything. Example: Your name/website name.
Setup property
- Property in Google Analytics is the data collection center for your website or application. An account can contain multiple properties .
- Enter the name of your website as the property name.
- Set the time zone and currency.
- Hit advanced options and enable create universal analytics property . Click universal analytic properties only.
- Press next and complete the information in the tab about your business. Click create and accept term of service
Setup reporting view
- Press admin (gear icon at bottom left)
- Click create view
- Choose a website
- Enter the name of the data type you want
- Choose a timezone
- Click create view
Add tracking code to your website
- Tracking code is required to ensure that data from your website can be processed.
- Tracking code needs to be added to each web page and a little technical.
- For WordPress users beginner , can try the plugins: Google Analytics Dashboard for WP.
- For wix users, the method is easier because there is a built-in tracking function.
How to add Google analytics tracking code using a plugin (Google analytics dashboard for WP).
- Add these plugins first to WordPress.
- Klik activate.
- Look for Google analytics plugins and press settings.
- Klik Authorize Plugin.
- Klik Get Access Code.
- Sign in to your Google analytics account and click allow.
- Copy the generated code.
- Go back to WordPress and enter the code into the access code field.
How to add Google analytics tracking code in Wix (premium users only).
- Make sure you have a Google analytics account first and make sure you have universal analytics properties (step during Google analytics setup).
- Get tracking id from Google analytic.
- Go to admin > account > properties.
- Copy tracking ID dalam format UA-123456789-0.
- Paste tracking ID dalam Wix.
- Open Wix and go to marketing integration.

- Go to Google analytics and click connect .
- Enter the tracking ID.
- Select IP anonymization so that Google does not save our own IP address.
- Press save.
Conclusion
There are various types of applications and tools that can help you to create your own website or blog. So, choose the one that suits your budget and technical skills. Good luck!
Share this:
Discover more from Inazifnani
Subscribe to get the latest posts sent to your email.


Good post! We will be linking to this particularly great post on our site. Keep up the great writing
This is really interesting, You’re a very skilled blogger. I’ve joined your feed and look forward to seeking more of your magnificent post. Also, I’ve shared your site in my social networks!
This is my first time pay a quick visit at here and i am really happy to read everthing at one place
Very well presented. Every quote was awesome and thanks for sharing the content. Keep sharing and keep motivating others.